Thank you for your order of "My Favorite February Ideas & Activities." February is always a super busy month with Groundhog's Day, Dental Health Month, Lincoln's birthday, Washington's birthday, and Valentine's Day. I have included activities for each of these celebrations. I hope that you will find some of these to be your favorites, too. Please let me know if you have any questions.
****Please note that these files are optimized for Adobe Reader version 7 or newer. You may be unable to print correctly if you have an older version of this program. This program is free at the following link.
![]()
February Bingo
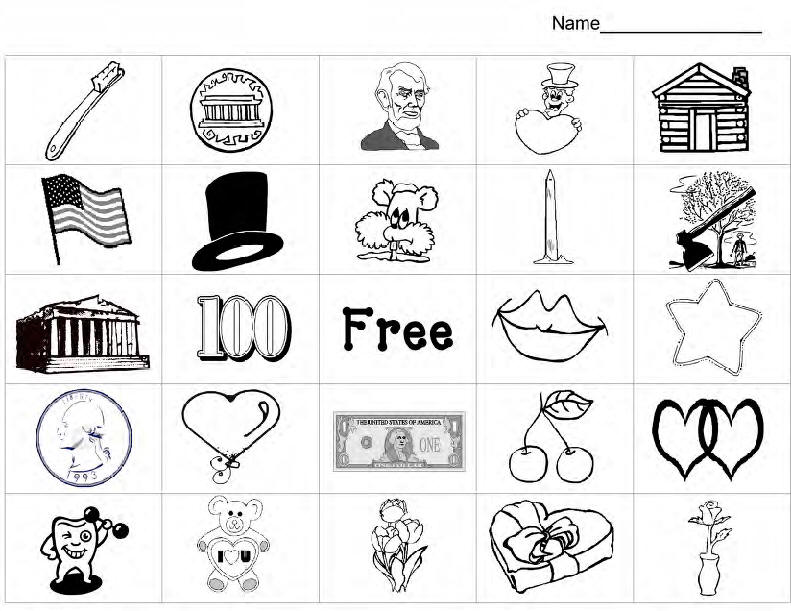
The Bingo card and pictures can be copied on regular copy paper. The children cut out the pictures and glue all of the pieces in random squares on the Bingo blank playing card (grid.) Each child's card is unique since they are all placed randomly. This prevents too many winners at once. I cut out a set of pictures to use for playing the game and put all of them in a little box to draw out the pictures for playing. I have the students keep their Bingo cards in their cubby for playing when we have a few minutes throughout the month of February. If you don't have cubbies, you can collect the cards each time you play. I have found poker chips work well for placing on pictures. Or, you can cut small squares of paper for the students to use to cover their pictures. We usually give stickers or some small prize for the winners. This is also fun to play at the Valentine's Day Party!

BOOM Card Game
I use cardstock paper to copy the cards to play Boom, but you can also use construction paper. The cards can be laminated and used over and over.
***You might need to copy more sets of cards if you are playing Boom with more than two or three players.
Rules of the game:
"Boom" is a card game that can be played with as many as six or seven children. Or, it can be played with only two. You can play the game for alphabet letter identification or for letter sounds. There are four pages of cards with Boom cards. You might not want to use all of the Boom cards. You also might need more alphabet letter cards if you are playing with more than two or three students.
The dealer (adult) flashes a card from the top of the deck to the student. If the student can identify the letter, he/she gets to keep the card. If he/she cannot identify the letter or sound, the next player tries. The game continues with each player. When a player receives a "Boom" card, he/she loses the cards to the dealer! Even though the player loses his/her cards, he or she can continue playing---the player has to start collecting cards again. The player who has the most cards in their hand at the end of the game is the winner! The game continues around and around. You can put a time limit on the game using a timer. We usually set a time at the end of the center time, etc. The children absolutely LOVE this game and beg to play it over and over again! After they learn the rules, you might like for the students to play this independently.
Boom High Frequency Card Game PDF
Groundhog Day

Groundhog Poem
This is a fun little rhyming poem in a banner that can be printed and taped together. It can also be mounted on a construction paper strip or butcher paper. It will last for years when laminated! Or, you might choose to put it on sentence strips to track on a hanging chart.
Silly Mr.
Groundhog,
Pop out your head and say,
Will there be six more weeks of winter,
Or, will springtime come our way?

Another fun poem to use for Groundhog's Day!

Groundhog Puppet

1. Copy the groundhog puppet on brown paper. Students can add color or details with crayon. The groundhog is cut out and glued on a popsicle stick.
2. Each student will need 1 1/2 paper plates. Please see photo for attaching the bottom half of the paper plate. When stapling the bottom portion, leave a space without staples at the bottom (center) of the two plates for the popsicle stick. You might want to use tongue depressors if they are longer. I stapled the paper plates together before doing these in class.


2. Students color with crayons or colored pencils for the grass, ground, sky and sun.
3. You can attach the poem to the back of the paper plate.
Groundhog Shadow Investigation:
http://home.howstuffworks.com/groundhog-day-activities2.htm
This site has a fun activity to make shadows with a flashlight.
Groundhog Headband
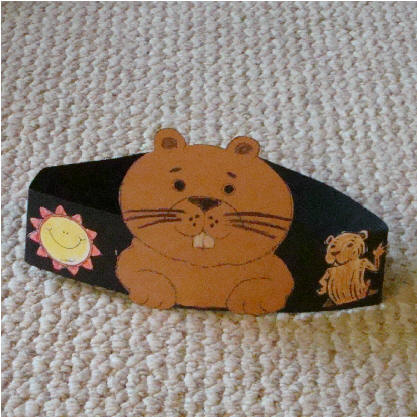
These little headbands are fun to make to wear home on Groundhog's Day.
PDF Groundhog Headband Patterns file
Children will need a copy of each of the above.

Students can color the sun and small groundhog. Details can be added to the large, brown groundhog. Each piece is glued on the headband. I used a 2x18 inch strip of black construction paper for the band. I stapled a rubber band to both sides of the strip so that it would stretch to fit any size head! Neat trick I learned from another Kindergarten teacher that saves a lot of time. (see photo) This avoids having to fit each headband during class time. Children glue the pieces for the headband on the front side of the headband.
Groundhog Story
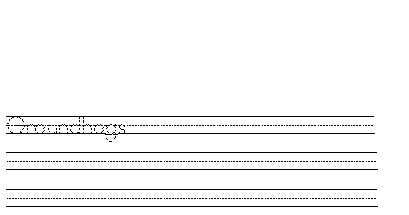 Dotted
lined paper for students to write or dictate a story or factual
information about groundhogs. I have also provided a
colored cover if you would like to bind/staple all of the stories
together for a class book.
Dotted
lined paper for students to write or dictate a story or factual
information about groundhogs. I have also provided a
colored cover if you would like to bind/staple all of the stories
together for a class book.
 The
cover can be mounted on construction paper and stapled or bound.
I have had better luck with a heavy duty stapler in binding class
books. I have left a space at the bottom of the cover for
the date if you would like to add. When the covers are
laminated, they can last more than one year--without the date!
The
cover can be mounted on construction paper and stapled or bound.
I have had better luck with a heavy duty stapler in binding class
books. I have left a space at the bottom of the cover for
the date if you would like to add. When the covers are
laminated, they can last more than one year--without the date!
Groundhog Book
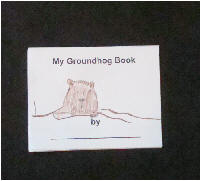
Copy book and collate book. Each student illustrates the cover and colors pictures inside. Story can be read with or to students.
PDF File for Student Groundhog Book
Groundhog Graph
 Make
a fun graph to predict what each child thinks will happen on
Groundhog's Day. Will the groundhog see his shadow?
We read stories and discuss what
happens on Gr
Make
a fun graph to predict what each child thinks will happen on
Groundhog's Day. Will the groundhog see his shadow?
We read stories and discuss what
happens on Gr oundhog's Day.
 I encourage
the children to watch the news on Groundhog's Day morning to see what
happens in Punxsutawney, PA. We watch the news in the
morning of Groundhog's Day to find out if he was able to see his
shadow. The kids get very excited! There is an
official web site that has information
for teachers at:
http://www.groundhog.org/teachers/
I encourage
the children to watch the news on Groundhog's Day morning to see what
happens in Punxsutawney, PA. We watch the news in the
morning of Groundhog's Day to find out if he was able to see his
shadow. The kids get very excited! There is an
official web site that has information
for teachers at:
http://www.groundhog.org/teachers/
I copy both of the groundhogs on brown construction paper. Each child receives a groundhog to make his/her prediction --with a shadow or without a shadow. We write their name at the bottom of the groundhog and then glue on to the graph/chart. The banner will need to be printed and taped or glued together. I attach it to the top of a large piece of bulletin board type paper such as butcher paper.
Groundhog Graph Patterns PDF files
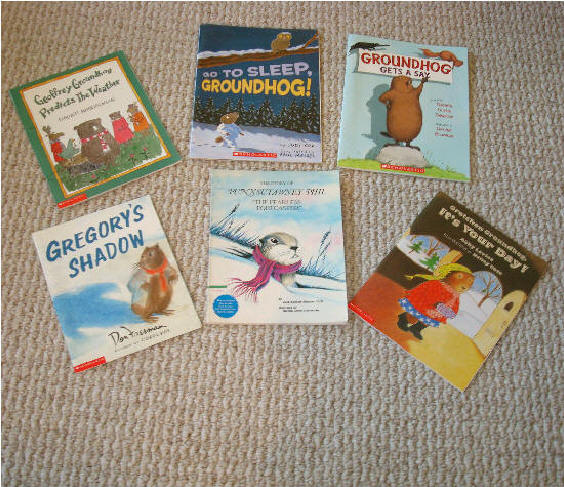
Fun Books --- Groundhog's Day
These are some of the books that I used for Groundhog's Day. I also found lots of factual information on line about groundhogs. Groundhogs are also called prairie dogs!
Dental Health

Toothbrush Chart
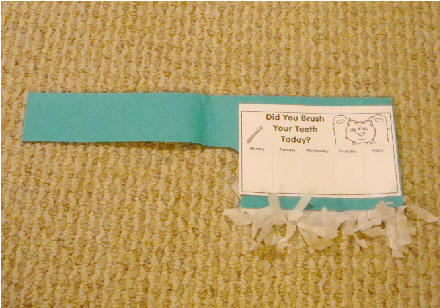

Make a tracer pattern using this pattern. The paper wasn't long enough to include a complete pattern. I used different colors of 12x18" construction paper to make the toothbrushes.

You will need to fold the 12x18 construction paper in half vertically. Place tracer on the fold as indicated. Since the tracer is only 11 inches long, you will need to extend the line to the end of the paper to make the handle of the toothbrush 18 inches long. Please see photo.

After cutting the toothbrush, open and insert tissue paper for the bristles of the brush.
Bristles: Stack three sheets of tissue paper that is cut 7 ½ x 4 ½. Glue the sheets on the blue paper about 2 inches from the bottom of the toothbrush. The tissue paper hangs off the toothbrush for the fringe. After the bristles are fringed, close the toothbrush and glue top and bottom sections together.
 Each student will need one
chart to glue to the front side of the toothbrush. Please
see photos, but let me know if you have any questions.
Each student will need one
chart to glue to the front side of the toothbrush. Please
see photos, but let me know if you have any questions.
Tooth Brushing Award
You can choose the directions on how you would like to use the award. I have provided a letter that I have used for parents to complete the chart with their child.
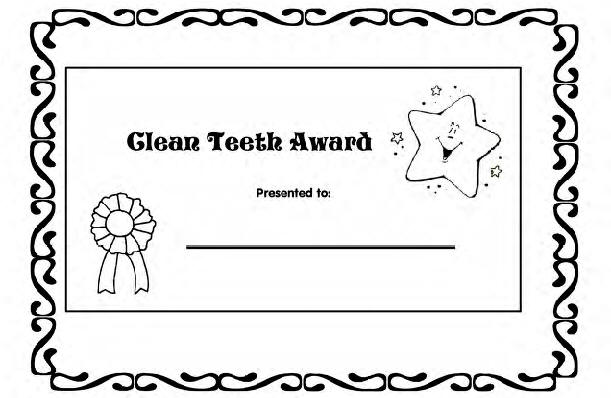
Each child is presented an award for successfully completing the project. These can be copied on regular copy paper or white drawing paper.
Paper Bag Puppet
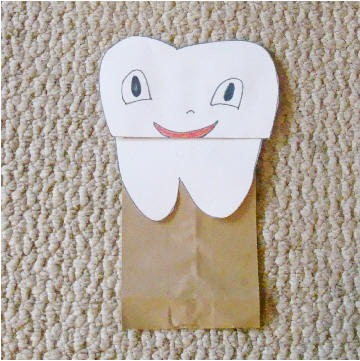
Copy the pattern for the paper bag puppet on white construction paper or white drawing paper. Students can color the mouth and cut out pieces. The top of the tooth is glued to the bottom flap of the paper bag. The bottom of the tooth is placed to match the top part of the tooth---underneath.
Dental Health Songs
I've Been Brushing!
(Sung to: "I've Been Working on the Railroad")
I've been brushing with my toothbrush
Brushing everyday.
I've been brushing with my toothbrush,
It's how I fight decay.
All my teeth are gonna sparkle,
How proud I will be.
Every time I want to smile,
My teeth will shine for me!
Always brush your teeth,
Every single day.
Keep those cavities away!
Use your brush and paste,
Just the way you should,
Keep your smile a looking good!
Got My Toothpaste
Sung to: "Twinkle, Twinkle, Little Star"
Got my toothpaste, got my brush,
I won't hurry, I won't rush.
Making sure my teeth are clean,
Front and back and in between.
When I brush for quite a while,
I will have a happy smile!
Abe Lincoln

1. Lincoln's Hat---This fun activity can be done by having students draw pictures of what they would carry in their hat, or you might have them write things inside the hat to tell what they would carry.
PDF File for Lincoln Hat Story
PDF file for Lincoln Hand and Patterns

2. Copy all three pattern pieces on construction paper. I used black construction paper for the arm/hand and the hat brim. You might choose to trace each child's arm/hand, but I found it too time consuming. The face was copied on flesh colored construction paper. You might want to just cut strips of black paper 5" x 1 ½ inches for the hatband instead of copying them. I have had good luck copying these patterns on black construction paper. Believe it or not, you can see the black lines on the black paper! Try it and see if it works. It saves a lot of time if you don't have to trace all of the pieces.
If you don't have flesh colored construction paper, you can have the children color the face with flesh colored crayons using white construction paper.
After decorating the face, glue face to arm/hand pattern. The hatband covers the top of the face pattern.

3. This project was a bit difficult for Kindergarten students to do independently. We usually worked with our 3rd grade Reading Buddies when doing this project. I have given two different sizes of star patterns for you to be able to choose which one works best for your students. The larger star is easier for the students to cut out and could be used with a full size 12x18 piece of white construction paper. The smaller star was used with a 9x12 piece of white paper.
1. Each student was given several red and blue stars to glue on the white paper. We gave directions to not put them too close together--scatter on the page. Then they alternated with red and then blue lines made with crayons. These lines were continued out to the edges of the paper or until the lines run into other lines.
2. I found the kids had some trouble keeping the red and blue lines straight---they started rounding the lines. We demonstrated how to draw around the stars leaving a bit of space between. This is where the older student can help.
3. If you feel this might be too difficult for your students, it is also possible to use the stars and have the children just cut stars to glue on the white paper. It would still be very patriotic with red and blue stars on white paper!
We Love America Banner ---Red Letters
We Love America Banner---Red, White and Blue
Honest Abe Ribbon
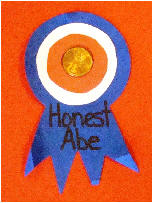
Patterns are copied on red, white and blue paper --see photo above. After all the pieces are cut and glued, a penny was glued in the center of the red circle. HEADS UP!
Lincoln Book
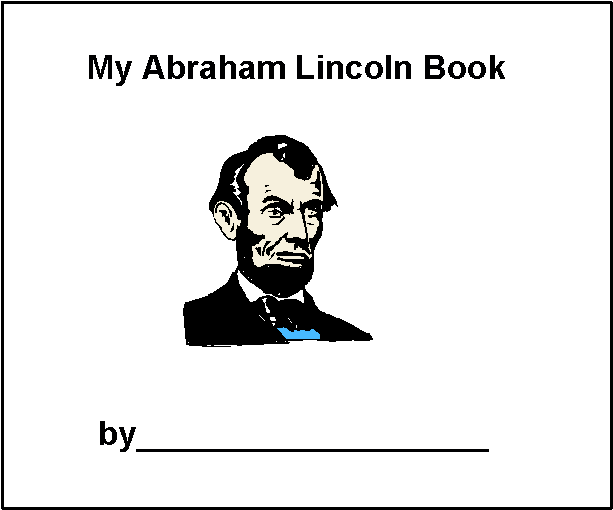
Students can illustrate, cut and collate this short little book.
Lincoln Log Cabin
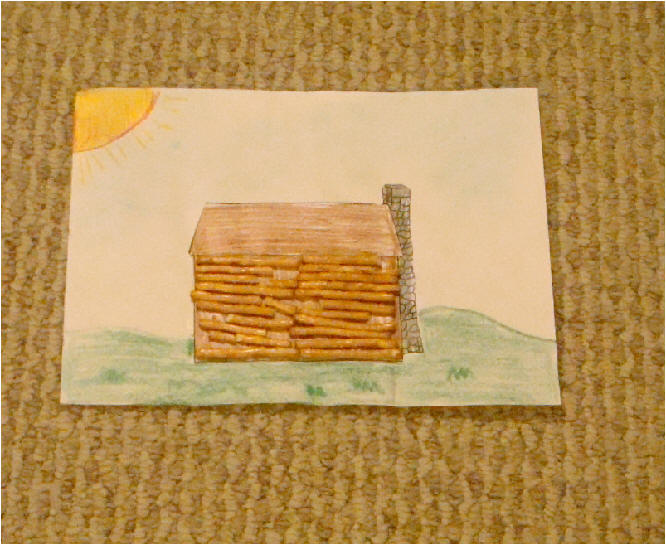
Students glue log cabin to the 9x12 white construction paper. It is easier to illustrate the picture before adding the pretzels. Glue is spread on the house and then pretzels are laid down like logs. Kids love to decorate the house with pretzels, and I always let them have a few pretzels after all of the cabins have been decorated.

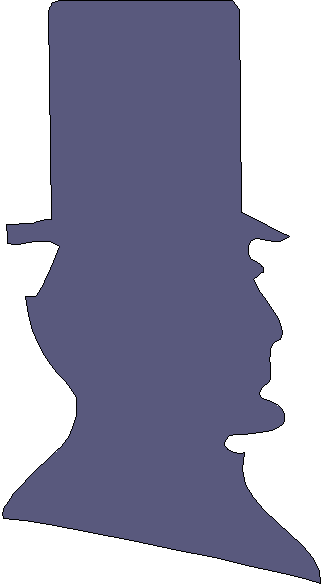
Lincoln Silhouette
The pattern can be copied on black construction paper for children to cut out. These silhouettes can be used along with the silhouette of Washington, too.
Celebrating Washington's Birthday

Three Corner Washington Hats
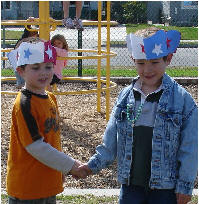
Patterns are copied on red, white and blue construction paper. The hats are stapled together to fit each child's head. Stars are also copied in all three colors to attach to contrasting sides of the hat. I put the words to the poem "Three Cornered Hat" on sentence strips to track the words with the class. The poem is copied on regular copy paper and we attach the poem on the inside of the three cornered hat.
Washington's Hat & Poem PDF file
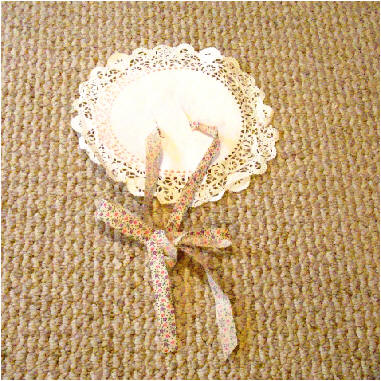
Martha Washington Hats

12 inch doilies were used to make the Martha Washington hats. I used a 10 inch circle of pink construction paper for the underneath side. Small dots are needed around the pink paper to hold the two pieces together. A 10 inch round dinner plate makes a good pattern for the hat! Two slits about 2 inches long were made through both layers to thread the ribbon through. One yard of ribbon is needed for the ties. *** Note-- The ribbon in the photo is longer than a yard and a bit longer than is needed. The girls loved these fancy hats!
Smaller doilies can also be used and a smaller circle of construction paper to fit the smaller doily.
Washington Silhouettes
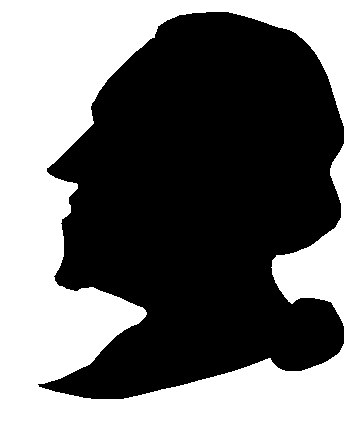
The silhouette pattern can be copied on black construction paper to use for a bulletin board display or to include with a writing assignment. It's fun to make silhouettes of Washington and Lincoln facing each other.
Washington Silhouette PDF file
George/Washington
We use this poem for extra practice in handwriting. Then we practice tracking the words on with the poem written on sentence strips on a pocket chart. The kids love tracking the words with the big pointer. Then we see who can memorize the poem. I ask them to take their paper home and practice it with their family. Then, we check the following school day to see who can still remember the poem!
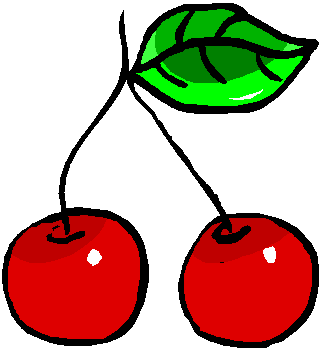
Make a Cherry Pie!
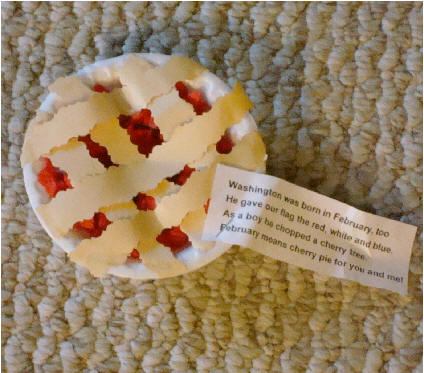
Even though we all know the legend of Washington and the cherry tree is probably not a true story, we read the book about it. Then we make our own cherry pie! I used Styrofoam small, bowl type plates that were about 4 1/2 inches wide. I think these were purchased at Smart & Final. Any size of small bowl/plate would work. The students crumpled pieces of red tissue paper to look like cherries and glued to the plate. I used the decorative scissors to cut strips of Manila (beige) colored paper to look like pie crust. If you don't have any of these scrapbooking type scissors, you could use pinking shears or just plain straight lines. The strips were laid down on the plate and crossed. The excess paper was cut off. Then dots of glue were put on the strips to hold them down. We attached the poem to the side of the plate, but you might want to attach it to the bottom of the plate.
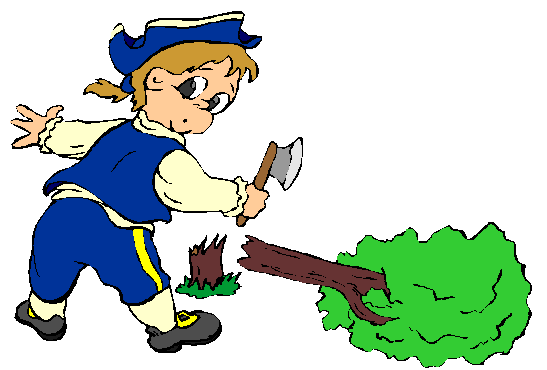
Washington's Hatchet

The students love making the little paper hatchet. We discuss the legend of Washington and the cherry tree. It is stressed that a real hatchet can be a very dangerous weapon. We discuss how important it is to not use it even a toy as a weapon, too. The class is warned that anyone using the hatchet as a weapon will lose their hatchet!
Copy the hatchet pattern on gray construction paper. A 12x9 inch piece of brown construction paper is rolled (TIGHT) around a pencil. The pencil is removed and the coiled paper is taped in several place to hold it tight. These will need to be done by an adult. I try to get a parent to help me roll all of the handles prior to doing these in class.
Students cut out the hatchet. It is folded in half and stapled near the handle end and also at the other end of the hatchet to hold it in place.
Washington's Hatchet pattern PDF file
Valentine's Day Activities
![]()
This home project is super easy to do with your class. Hearts can be copied on colored or plain white paper. Cardstock or heavy construction paper works best. It's fun to see what fun, creative ideas parents and children create with just a heart!
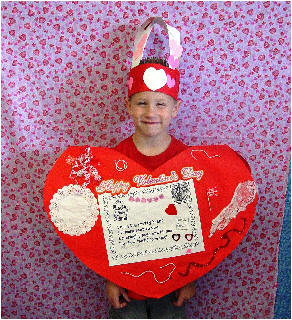
Giant Hearts!


This is a project that takes a bit of planning but is lots of fun to do.

Valentine's Day vest pattern was made on heavy chart type paper. The top of the pattern is place on the fold of butcher paper (bulletin board) and traced on white or red paper. The pattern was too large to include, but should be fairly easy to make on your own.
 This is a
photo of the vest opened up after tracing on red paper.
This is a
photo of the vest opened up after tracing on red paper.
The vest in the photo is approximately 15 inches long and 24 inches wide. If you need a pattern for this vest, I can mail it to you for a small charge.
Valentine Express poem and letter to parents PDF file
Helpful Hints for decorating:
1. I have parents help to trace all of the Valentine vests prior to Valentine's Day. I also ask parents to tie the ribbons into bows before the day we make the vests. These should be completed before Valentine's Day for the glue to dry before going home. I try to have extra help on the day we decorate. Hot glue guns can also be used for heavier things by ADULTS only!
2. We ask students to share things from home. However, if there is something special that is brought, the student's name is put on the decoration and reserved for him/her. Usually there are plenty of stickers, bows and "junk" to go around for all. I try to stock up on decorations at the after Valentine's Day sale for the next year.
3. The poem can be colored and decorated prior to the day you decorate the vest. This should be attached to the front of the vest first.
4. We usually did not decorate the back since it was difficult to decorate both sides on the same day. But, you might have students decorate over two or three days.

Directions for making Valentine crowns
1. Adult glues two strips of red, pink or white construction paper strips together that are approximately 2 ½ -3 inches x 12 inches long. The strip is fit to each child's head and excess cut off the end. You might choose to use the rubber band idea listed above for the groundhog headband, but there will be a gap in the back of the crown. For this headband, I like to have it finished all the way around.
2. Cut two long strips of contrasting colored construction paper for the crown top approximately 1 ½ wide x 18 inches long. Staple each strip so that they cross as shown in the photo above. Staples can be covered with heart decorations.
3. Each child is given stickers or different colored hearts to cut out and decorate their crown. I like to copy the hearts pattern in pink, red, and white. Students attach hearts on contrasting colors on the hat. These can be decorated prior to Valentine's Day in order for them to be completely dry.
The kids absolutely LOVE these crowns and love to wear them back to school after Valentine's Day!
Valentine Bulletin Board "Weaving in Kindness!"


This is a bulletin board that I loved each February. Cut a very large, white heart approximately 4 feet across and 3 long using butcher paper. Fold this heart and measure about every 2 inches. I cut a slit across (horizontal cuts) from the top of the point of the heart to about 5 inches from the tip of the heart. Then I weave red and pink strips of butcher paper in and out vertically to create the checkerboard effect. Glue the ends with glue. It takes a bit of time to do, but will last if laminated. You could also make this out of felt that will last forever? The strips can also be glued with felt.
Each child makes a portrait of themselves using the face pattern. These are decorated and put around the heart. We used yarn and craft doll hair. We also used different shades of paper for skin tones.
Weaving in Kindness Patterns PDF file.
Weaving in Kindness Banner PDF file
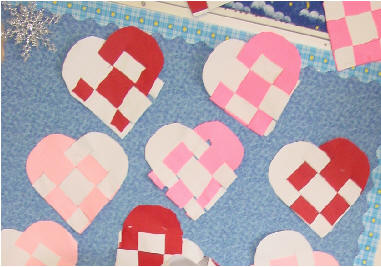
Copy two, contrasting colored patterns for each heart. Cut out heart pieces on the lines. The two parts are set at an angle and woven over and under to make the complete heart. Trim ends as needed.
Bottle Beastie
Valentine Containers
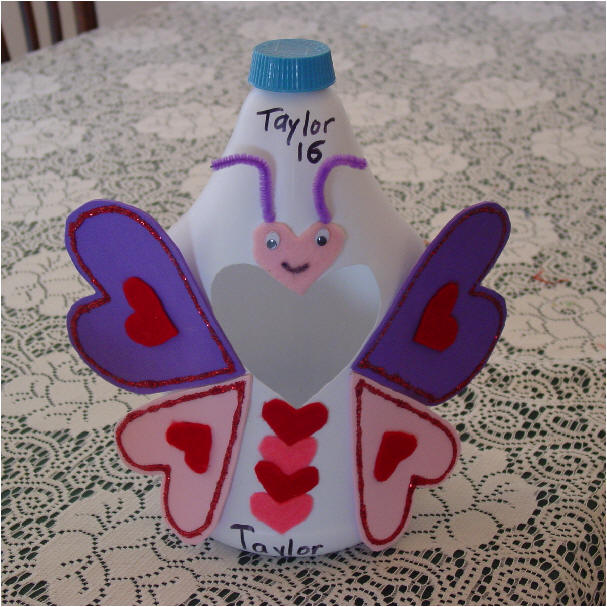
These containers were constructed as a home project using a plastic bottle. A parent letter is provided with directions and ideas to assist their child. I have always been amazed at some of the creative ideas that are completed. It is also an easy solution for making containers!
Parent Letter for Bottle Beastie
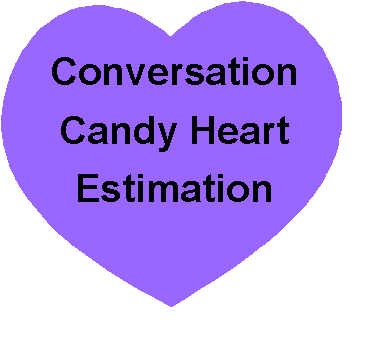
This is a fun way to use candy hearts to introduce the concept of estimation! The worksheet can be completed in a small group setting with students. I empty the candy from the box and put in a zip lock bag before doing this activity in class. I use the box to make a Valentine magnet shown below.

Candy Heart Worksheet PDF file
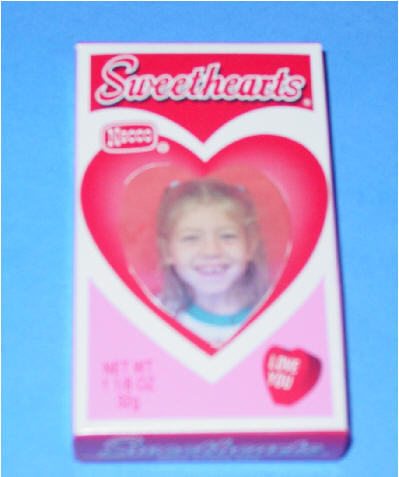
These fun, little photo Valentines were made using the box of Conversation Heart candy. I carefully opened the boxes and emptied the candy out into zip lock bags for the estimation activity above. Then I hot glued the lid closed. A disk magnet was hot glued to the back of the candy box. I have found the magnet strips don't hold as well as the round disk type magnet. These magnets are available at Michael's or Walmart. A photo of each student was cropped into a heart shape (on the computer) and glued in the little cellophane window on the candy box. You can also have the pictures printed and cut them out in the shape of a heart if you aren't able to do this on the computer. It is difficult to tell the size of the photo since there are different sized cellophane windows---depending on the candy company.
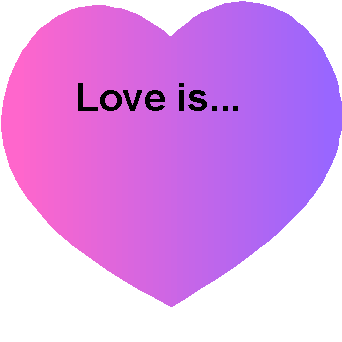
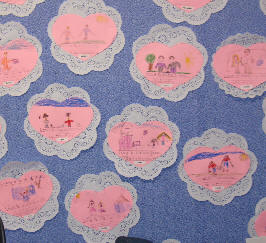
Story paper is printed on white or pink paper. You might like to use colored doilies with the white writing paper. We discuss things that we "love." I try to get the children to think about things that are very special such as family, pets, or people rather than toys and tangible things! Students illustrate the top portion of the paper. These stories were mounted on the scalloped doilies, but you can also use heart shaped or round doilies. These can also be saved for Memory type scrapbooks, too!
 After
these stories have been taken down from the bulletin board, you
might like to bind them into a book for the children to read.
There is a book cover that you can mount on a piece of
construction paper, cut out or use as you like.
After
these stories have been taken down from the bulletin board, you
might like to bind them into a book for the children to read.
There is a book cover that you can mount on a piece of
construction paper, cut out or use as you like.
Thanks again for purchasing the February Ideas package. If you have any questions, please let me know.