Monthly Block Projects

Thank you for your purchase! I hope that you enjoy making the blocks as much as I have with the children in my classroom. I have been making these little block creatures with my Kindergarten classes for about 10 years. I started with one and everyone loved them so much, I decided to make one for each month.
I have a few general type helpful hints that I would like to pass on to you.
Wood
Parents are usually more than willing to cut the pieces of wood into 2x4x6” pieces. I have found that fathers love being able to help out with the wood. I try to keep the wood stocked ahead for the next month to be prepared! I also encourage the father or whoever is cutting the wood to smooth the edges of the wood to avoid getting splinters. Not fun!
Paint
I use acrylic type paint that I purchase at Walmart, JoAnne’s or Michael’s. I have found that Walmart is cheaper than anywhere else. I buy whatever brand has the best color for the block that we will be working on that month. I have bought Delta, Plaid-- Apple Barrel or whatever other brand is available. It doesn’t take a lot to cover a whole classroom of blocks. It is amazing how far it goes. Two bottles of the 8 oz size bottles is enough for a classroom of 20 children. It is usually less than $2 for the cheaper brand of paint.
Ribbon
I try to keep ribbon stocked for the different blocks. I often find ribbon on sale after the holiday that is much cheaper. I buy red and green ribbons at the after Christmas sale. I use the red ribbon in February for Valentine’s Day and the February blocks. I use the green ribbon for March projects and the Leprechaun blocks. You can find lots of fabrics in small remnants at Walmart. The seasonal fabric at Walmart usually sells for $2 per yard. It doesn't take much fabric for any of the projects.
Notions
I have a wish tree that I keep in the classroom for the parents to help out supplying the notions that are needed for the blocks each month. If you need 40 small washers that are 1/2 inch, it might be easier to purchase them at your local hardware store. Or, you could add them to your wish tree. I put the things that I need on a small post-it and the parent can take the post-it if they are able to provide that supply.
****Please note that these files are optimized for Adobe Reader version 7 or newer. You may be unable to print correctly if you have an older version of this program. This program is free at the following link.
![]()
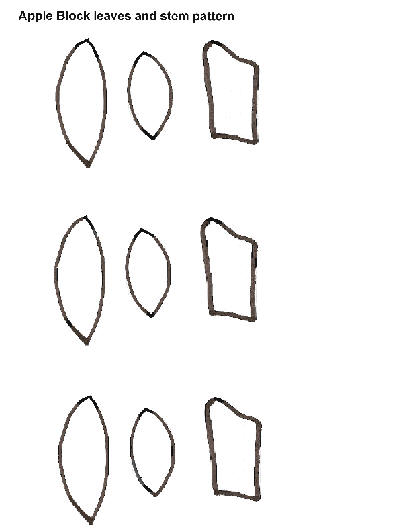
Apple Block for September

Patterns for the hands

Materials needed:
Red paint and paint brush
Green, brown and white fun foam or felt
Black and pink Painter markers
8" x 1" red, gingham check fabric --ribbon can also be used for arms.
10-12 inches Ribbon for bow on top
Small sharpened pencil for him to hold
Nail 1 ½ inch long
Directions:
1. Use hammer to drive the nail in the top and center of the block. This is used to hold the stem and leaves.
2, Put child’s name on the bottom of the block!
3. Use sponge paint brush or regular paint brush to paint the entire block (except the bottom where child’s name is.) If you place the block on a piece of aluminum foil or wax paper, it is easy to peel the block off after you paint!
4. Cut out and glue leaves and stem to the top of the block. I trace the leaves and stem on the foam and then the children cut out their own fun foam stem and leaves. The nail is sandwiched between the leaves and the stem to hold them up! Adult uses hot glue to hold in place.
5. I tear the fabric to give it a “primitive” look. But, you can cut the fabric or use ribbon for the arms. I tear a long strip of fabric and then cut into approx 8” strips. Tie a knot at the end of fabric or ribbon. Using a hot glue gun, glue one end of the strip to the back of the block and attach a hand to the other end for both arms. I used a small dab of hot glue to hold the hands/arms in place on the front of the block. Hot glue a small, sharpened pencil to one hand and glue pencil to the block.
6. Hot glue a small bow (optional) at the top of the apple block in front of the stem.
7. Child draws a face on the front of the apple. Encourage the child to place the eyes/eyebrow a few inches down from the top of the block. They usually want to put them high near the bow!
8. Have a happy fall!
Pumpkin Jack-o-lantern Block -- October


Materials Needed:
2x4x6” block of wood
Orange Paint
Paint brush
Halloween ribbon or curly ribbon
Raffia
Nails
Black Paint Marker
1 ½ inch nail with head
** Hot glue gun optional
Directions:
1. Nail can be hammered in first to provide a handle while painting the block.
2. Paint block with orange craft paint ---two coats might be needed. If you place the block on a piece of aluminum foil or wax paper, it is easy to peel the block off after you paint! J
3. Tie a small bow using raffia and Halloween ribbon around the nail (see above for ribbon ideas.) I used the curly ribbon on some of the first blocks that I made. However, it doesn't hold up as long as the satin or grossgrain ribbon. I put a small dab of hot glue on the bow and raffia to hold it in place.
4. Paint face using permanent paint markers.
***Tips
1. I have a parent hammer the nails in for me for them to be ready to go for the kids. Or, if you think your children can handle this part, great!
2. I have the kids paint the blocks one day and then do a second coat the following day---if needed. Some woods and some paints only require one coat.
3. I provide the children with plenty of ideas for what kind of jack-o-lantern face they might like to use. You can find all kinds of pumpkin jack-o-lantern faces if you Google “jack-o-lantern” and click on IMAGES. I print them out and have them available for the kids to look at. I avoid any of the ones that have teeth. The children have trouble doing those. Or, have the kids make their own designs. I always tell them that they can take the eyes from one pumpkin example, the nose from another, and the mouth from the third sample. That gives them ideas to be a little more creative. I have found that the kids usually want to put the face too high on the block. They often need a bit of guidance as to where to start the face. I tell them that frogs have eyes at the top of their heads! J
Turkey Block for November


To print, right click on the pattern and choose "SAVE TARGET AS" and choose where to save the file.
Then open the file and print pattern. Place top of the triangle on the fold of yellow felt
(diamond shaped when opened.)
Materials Needed:
2x4x6” block of wood
Brown acrylic paint and paint brush
Fall silk fall leaves ---either on a picks or garland
8-12 inches of brown ribbon or fabric (torn)
½ inch Washers for eyes purchased from the hardware store (can also use squiggle eyes or paint) Can be spray painted or left grey metal color
Yellow felt for beak (diamond shape—place top of the triangle on the fold of the felt)
Red chenille pipe cleaner approx 2” (I fold under both ends approx ¼ of an inch before gluing on face)
2 small wooden spools or wooden beads for feet (these can be purchased at Michael’s or JoAnne’s in a large package) I used 1” spools
Orange paint for the spools ( I use liquid watercolor for dyeing these) You can leave the spools or beads a natural color
*** see below for coloring beads using liquid watercolor
12” strip of ribbon or fabric I tear pieces of brown fabric scraps in pieces 12 inches long and approximately ½ wide. This gives the turkey a primitive look!
*** optional white spray paint or white acrylic to paint washer eyes
*** optional gold, glitter glue for sparkle on the leaves
Directions:
1. Paint block of wood using brown acrylic paint. (use black Sharpie pen to put name on the bottom of the block)
If you use aluminum foil or wax paper under the block, you can easily peel off it off without it sticking. If you use newspaper, it often sticks and makes it hard to read the child's name.
2. Paint or dye the spools (or beads) with orange paint. See note below for how to use liquid watercolor.
3. I tear the brown fabric in 12x1" strips. If you make a small cut in the fabric, you can tear it going across! Try it, it tears straight and saves a lot of time cutting each strip! Tie a knot in one end of the fabric strip. Thread a bead or colored spool on the end of the fabric and tie a knot to hold it on. Glue legs on the front of the block using hot glue.
4. Using the silk leaves, make a fan shaped arrangement on the back of the turkey with the right side of the leaves facing the front. Use hot glue to hold in place. I use one small leaf to cover all of the mess of the hot glue on the back. That makes it much nicer to look at both sides. It might be harder to get the leaves to hold up using a garland. I have found silk leaves on sale at Michael's and other floral outlet type stores.
5. Glue 1/2 inch two washers on the front of the turkey. I painted the washers using white spray paint. You can also use white acrylic paint.
6. Fold the yellow diamond shape beak that has been cut from felt on the front using white craft glue or hot glue. If you use white glue, you will need to weight it down. Add a dab of glue to the inside to make the diamond shape look like a triangle.
7. Using hot glue or white craft glue, attach the wattle to the side of the beak.
*** The children loved adding a bit of gold, glitter glue to the leaves for a bit of sparkle!
Liquid watercolor can be purchased from Discount School Supply -- http://www.discountschoolsupply.com/Product/ProductList.aspx?category=0&keyword=liquid+watercolor It works great on pasta dyeing and lots of other things. You put the spools in a zip lock bag, add a few drops of watercolor, shake the bag and dry on a piece of newspaper. Super easy and the colors are so much brighter than the old food coloring! I use it in the classroom for lots of things.
Reindeer Block for December


To print, right click on the pattern and choose "SAVE TARGET AS" and choose where to save the file.
Then open the file and print pattern.
Materials Needed:
2x4x6 inch block of wood
Brown acrylic paint
Black paint marker
Red pompom 1/2-1 inch size
Tan felt for ears
Pine Christmas garland
(comes in 12 foot lengths during the holidays at Michael's, Walmart or JoAnne's. It might take 2 packages to make 20 blocks.)
(It is often on sale for $1.99 per package.)
Chirstmas ribbon for bow
Directions:
1. Put name on bottom of block using black Sharpie. Paint block on all sides using brown acrylic paint.
2. Use hot glue or white craft glue to attach tan ears on the back of block. Ears should extend far enough on the sides of the block to see on the front side.
3. Cut pine garland in approximately 10-12 inches long pieces. Check to see if this is long enough to glue on the back and have it extend out far enough to show on the front side. Shape the antlers to keep each side balanced. Hot glue each pine antler on block. This should be done ahead of time by an adult.
4. Attach Christmas ribbon bow on top of block.
5. Using white glue or hot glue, attach red pompom nose on face.
5. Using a black paint marker paint eyes and nose on face.
Snowman Block for January


Materials Needed:
2x4x6 inch block of wood
White acrylic paint
Black paint marker
Squiggle eyes (or use black paint marker)
Carrot button nose (or make your own using orange chenille pipecleaner and green yarn.)
Black beads or use black paint for mouth
Knit cap or sock cut on end
Raffia for tie on cap
Directions:
1. Use black Sharpie to put name on bottom of block.
2. Paint block on all sides (except bottom) with white acrylic paint


3. Caps Make a cap by cutting off the toe end and tying it with raffia. If you are able to sew, you can make your own caps. I used a pattern of of copy paper (size 8 1/2" x 11") to make the cap. Fold the long edge under to make a hem and stitch using plain or decorative stitching. Fold rectangle in half with right sides together to make seam. The top of the cap is left open and tied with the raffia.
There are two types of caps that I have made. One is the cotton knit fabric ones that will need raffia or ribbon tied on the top. The other type of cap is a woven cotton fabric with a tie attached of the same fabric. Just let me know which ones you are interested in purchasing. The price will be $14.99 + shipping for a class set of 20 hats. Please see photos below. Let me know which ones you are interested in and how many you need. I can then calculate the cost.
Above: Cotton knit snowman hat after hemming and sewing back seam.


These are woven cotton fabric with ties already attached.
Finished Cotton Knit Hats

4. Carrot buttons are available for purchase at JoAnne's Fabric and other fabric stores. Or, you can make your own using orange chenille pipe cleaners and green yarn. I have been making my own noses using the pipe cleaners since they are much cheaper! Fold a 2" piece of orange chenille pipe cleaner in half around two strands of yarn but about 4 inches long. Apply white craft glue to the green carrot top and twist. I put these on a large piece of aluminum foil to dry and used a piece of tape to hold it in place until the glue dried. After the carrot nose is dry, I trim the green yarn top and cut the carrot tip into a slightly pointed shape like a real carrot. It is a bit time consuming to make, but they are cute! See photo below.

Lincoln Block for February
I have two different blocks that I use for February. Some years we make the Lincoln and other years we do the Cupid block!

Materials Needed:
2x4x6 inch block of wood
Pink or flesh colored acrylic paint
Black and pink paint marker
Tiny pink pompom for nose
Black felt for hat
Black curly hair ---Available at Michael's or other craft stores
Directions:
1. Write name of child on the bottom of the block
2. Use pink or flesh colored acrylic paint to paint all sides of the block
3. Using a small amount of curly hair, attach a bit of hair to both sides of the block using hot glue. Also attach a small amount of hot glue to the bottom of the block for Abe's beard.
4. Abe's hat is made using two different pieces of black felt. Cut a piece of felt 11 x 6 inches for the stovepipe part of his hat. Glue the hat at the bottom to attach it to the block with the stovepipe sticking up. We overlapped the pieces and glued the seam in the back with white glue. Then cut a piece of felt 6 x 1 3/4 inches for the brim. Use hot glue to attach the brim to the bottom (center on block) of the hat ---see photo. His hat is open inside!
5. Glue pompom in the center of the block using white, craft glue.
6. Use black and pink paint markers to add facial features.
February Cupid Block

Materials Needed:
2x4x6 inch block of wood
Red or Pink acrylic paint
Black paint marker
Red, pink or White Fun Foam hearts for cheeks Can be purchased at any craft store or Walmart
Wood or Fun Foam hearts for hands and feet --- also available at Walmart or most craft stores
Red, pink or white ribbon or fabric scraps for arms and legs
Raffia for top bow
***Ribbon and lace optional
***See photos below for different ideas on how to decorate the cupid.
Directions:
1. Write name on the bottom of each block and paint block using pink, red or white acrylic paint.
2. For arms and legs tear strips of Valentine fabric (heart type fabric) in strips approximately 6-7 inches long. Tie a knot in each end of the arms to attach with hot glue to the sides of the block. Tie a knot in one end of the leg. Attach the unknotted end to the bottom of the block with hot glue and bottom of the block.
3. Use black paint marker to make eyes, nose and mouth. Some of the children used a small white foam heart for the nose.
4. Ribbon or raffia can be used for the top bow. Some of the boys just put the ribbon around the bottom of the block. The girls added narrow lace to the bottom of their block. This is an opportunity to be creative!
Don't forget to include parents when gathering supplies. Most parents are very willing to help out with this!
These are sample blocks that were made by class last year. They are much more creative than I was with my sample above!!


March Leprechaun Block

Materials Needed:
2x4x6 inch block of wood
Pink or Flesh colored acrylic paint
Black and Red and Pink Paint markers
Pink --tiny pompom for nose This can be purchased at any craft store or Walmart.
Another option is to paint the nose with the Paint marker.
Red curly hair available at craft stores, or I usually purchase this on Ebay!
Green or St. Patrick's Day fabric ---available at most fabric stores and Walmart
*** optional Narrow 1/8" elastic for sewing inside the hat.
Tissue paper or Polyfil to stuff inside the hat ---this makes the hat poofy!
Green ribbon for bow
Black and yellow felt scraps for hat and buckle
***See photos below!
Directions:
1. Write name using a black Sharpie pen on the bottom. Paint block using light pink acrylic or flesh colored paint.
2. Glue red hair on the sides of the leprechaun's head and the bottom of the block for his beard. A little hair goes a long ways! You won't need much.
3. I use a 10 inch dinner plate to make the circular hat and cut fabric using Pinking shears. This prevents the fabric from fraying. There are several options for making the hat. Stuff a bit of Polyfil or tissue paper inside the hat. Adult hot glues the hat in place on the top of the block.
1. The first one is to pinch-pleat the fabric using hot glue a little at a time working your way around the wooden block--no sewing involved.
2. The second choice is to sew a narrow piece narrow 1/8 inch elastic (approximately 9-10 inches long) elastic inside (on the wrong side of fabric.) Click on the photo to the right to see how to sew the elastic inside. I sew the elastic about an inch and a half from the outside edge and stretch it very tight as i sew on top of the elastic. The elastic gathers the hat to make a ruffled brim. See hat offer below---
3. You can purchase small, plastic hats from party stores before St. Patrick's Day.
4. Cut a 12 inch x 1 inch strip of black felt for the hat brim. Hot glue this over the seam where the elastic stitching shows on the outside. Cut a yellow rectangle 1 1/4 inches x 3/4 inches. Hot glue this in place to cover the overlapped area of the black hat brim. Cut a very small rectangle square for the center of the buckle. (approximately 3/8 x 1/4 inches)
5. Use Paint Marker to make eyes, cheeks and mouth. Attach the small pink pompom for the nose. You can also use the markers to draw the nose in place.
I will be offering a set of caps for sale for anyone who would like to purchase these. There are a few samples of some of the fabrics. The prints might vary throughout the year as to what fabrics might be available. Please send me an email if you are interested -- linda(dot)c(at)kinderteacher(dot)com (please replace the words inside the () with the correct symbol) The price will be $14.99 + shipping for a class set of 20 hats. Please see photos below.
Happy St. Patrick's Day!


April Bunny Block

Materials needed:
2x4x6" block of wood
White acrylic paint
Paint markers (purchased at Michael's)
1 1/2 inch wide ribbon for bow
Pink button nose (purchased at Michael's) or small pink pompom
Embroidery floss or heavy black cording for whiskers
2 pipe cleaners to make the ears sturdy to stand up
White left for making ears
Pink felt for inside the ears

Click on pattern to enlarge to full size. The ears should be approximately 7 inches long and the pink insert should be approximately 4 inches long. To print, right click on the pattern and choose "SAVE TARGET AS" and choose where to save the file. Then open the file and print pattern.
Directions:
1. Put name on bottom of block with black Sharpie and use white acrylic paint to paint all sides of the block.
2. Cut 2 sets of ears using the pattern provided below for the ears. Sew or glue 2 pieces together to form one ear---leave the bottom opened to feed the pipe cleaner inside. Glue one smaller piece of pink felt on the top of the ear. Use one white pipe cleaner to stuff inside the ear to make the ear sturdy enough to stand up. Repeat directions for the other ear.
3. Tie one bow on top of bunny for decoration.
4. Glue one pink button or pink pompom on face for nose and black embroidery threads for whiskers.
5. Use pink and black Paint Markers to draw facial features.
2. I made the ears using white felt. The ears are approximately 7 inches long. The pink felt insert is about 4 inches long. I cut two ears and stitched them together around the sides. The bottom was left open for a pipe cleaner to be inserted. This made it possible for the ears to stand up. The felt ears weren't stiff enough to stand up on their own.
The children used the white acrylic paint to paint the block. When dry, we had each child use the paint markers to paint the eyes and mouth. The embroidery floss was used for whiskers. The pink heart shaped button was attached on top of the floss with white glue.
May Bee Block

Materials needed:
2x4x6" block of wood
Yellow acrylic paint
Red Paint markers (purchased at Michael's)
Red ribbon for bow
Small wood or foam red heart
Black felt for stripes. *** See note below
Squiggle eyes –1/2 inch
Black chenille pipe cleaner
One ½ bead
Pre cut Tulle netting circles used for wedding favors (purchased at Walmart)
*** Note— I used black felt that had an adhesive peel off back. It is a bit more expensive, but much easier to cut on the paper cutter. It is also easier for children to peel off the back!
Directions:
1. Write name on bottom of block with black Sharpie pen. Paint block on all sides with yellow, acrylic paint.
2. Starting at the bottom, glue the three stripes on the block. Use white glue to attach foam or wooden heart.
3. Attach the small bead to the top of the bee using white glue or hot glue. Let dry. Carefully have children bend the 12 inch black pipe cleaner in half and bend tips to look like an antennae. Put a few drops of glue inside the hole of the bead and push the pipe cleaner inside. The pipe cleaner should stand up! Attach bow to the top of block and in front of the antennae.
4. Glue squiggle eyes with white glue
5. Use red Paint Marker to make bee’s mouth.
![]()